
Setting up Continuous Deployment to Nano Server in Azure - Part 1
There is plenty of documentation online on how to setup and Administer Nano Server as well as how to get a .NET Core Application to run on Nano Server. I wanted to take that a step further and demonstrate a practical way setting up Continuous Deployment of a .NET Application from GitHub to a Nano Server running in Azure using Azure Automation.
This will be the first of a series of blog posts that demonstrate how to set this up scenario along with some of the practical and security considerations to take into account while setting this up.
Overview
This article is the first in a series of blog posts on setting up continuous deployment to Nano Server in Azure.
- Setting up Continuous Deployment to Nano Server in Azure - Part 1
- Setting up Continuous Deployment to Nano Server in Azure - Part 2
- Setting up Continuous Deployment to Nano Server in Azure - Part 3
This article will cover the following:
- Deploying Azure Automation Resources using PowerShell
- Deploying a Nano Server in Azure from GitHub
- Deploying IIS and ASP.NET Core to the Nano Server
Prerequistes
Make sure you are following the instructions below on a host running Windows 8.1 and higher or Windows Server 2016 RTM. Additionally, make sure you have Co-Administrator or an Azure Organizational Account with access to an existing Azure Subsciption. A solid understanding of PowerShell is highly recommended.
Deploy Azure Automation Resources using PowerShell Script
The Azure Resources that are required for this demo will be deployed using the PowerShell script, setup-deployment-env-for-nano-server-in-azure.ps1.
This script is responsible for the following:
- Creating two Resource Groups, one for Azure Key Vault and one for an Azure Automation Account
- Creating an Azure Key Vault
- Creating an Azure Automation Account
- Adding the Nano Server Local Administrator Credentials to the Key Vault
- Creating a Self-Signed Certifiate for Nano Server and storing it in the Key Vault
Full details about the Script can be reviewed within the script itself.
Open up an elevated PowerShell prompt and download the PowerShell script locally to your machine in C:\Windows\Temp.
Invoke-WebRequest `
    -Uri "https://raw.githubusercontent.com/starkfell/starkfell.github.io/master/scripts/setup-deployment-env-for-nano-server-in-azure.ps1" `
    -OutFile C:\Windows\Temp\setup-deployment-env-for-nano-server-in-azure.ps1
Next, run the PowerShell script using the Syntax and Example below as a guide:
Syntax:
C:\Windows\Temp\setup-deployment-env-for-nano-server-in-azure.ps1 `
-SubscriptionId <SUBSCRIPTION_ID> `
-AzureAutomationResourceGroupName <AZURE_AUTOMATION_RESOURCE_GROUP_NAME> `
-AzureAutomationAccountName <AZURE_AUTOMATION_ACCOUNT_NAME> `
-AzureAutomationPricingTier <AZURE_AUTOMATION_PRICING_TIER> `
-AzureAutomationCertificatePassword <AZURE_AUTOMATION_CERTIFICATE_PASSWORD> `
-KeyVaultResourceGroupName <AZURE_KEY_VAULT_RESOURCE_GROUP_NAME> `
-KeyVaultName <AZURE_KEY_VAULT_NAME> `
-NanoServerLocalAdminUsername <NANO_SERVER_LOCAL_ADMINISTRATOR_USERNAME> `
-NanoServerLocalAdminPassword <NANO_SERVER_LOCAL_ADMINISTRATOR_PASSWORD> `
-NanoServerCertificateName <NANO_SERVER_CERTIFICATE_NAME> `
-NanoServerCertificatePassword <NANO_SERVER_CERTIFICATE_PASSWORD> `
-Location <LOCATION>
Example:
C:\Windows\Temp\setup-deployment-env-for-nano-server-in-azure.ps1 `
-SubscriptionId 87d031cb-5fde-412d-b09c-c44c16131488 `
-AzureAutomationResourceGroupName nano-automation `
-AzureAutomationAccountName nano-automation `
-AzureAutomationPricingTier Free `
-AzureAutomationCertificatePassword NanoMation1! `
-KeyVaultResourceGroupName nano-key-vault `
-KeyVaultName nanokeyvault `
-NanoServerLocalAdminUsername winadmin `
-NanoServerLocalAdminPassword NanoMation1! `
-NanoServerCertificateName nanoservers.lumadeep.com `
-NanoServerCertificatePassword NanoMation1! `
-Location westeurope
The output from the script should return two values once the script has completed successfully:
- Azure Key Vault Resource ID
- Nano Server Self-Signed Certificate Secret Identifier

Make note of both of these values before continuing.
Deploy a Nano Server to Azure from GitHub
Click on the Deploy to Azure button below. A new tab will open up prompting you to login to your Azure Subscription if you haven’t done so already. The Custom deployment blade will open up and allow you to deploy a new Nano Server to Azure. You can Browse to Deploy Nano Server and VNet into Azure for more information about the Template.

If you are not already logged into your Azure Subscription, you will be prompted to do so. Once you have logged into your Azure Subscription, the Custom deployment blade will appear.
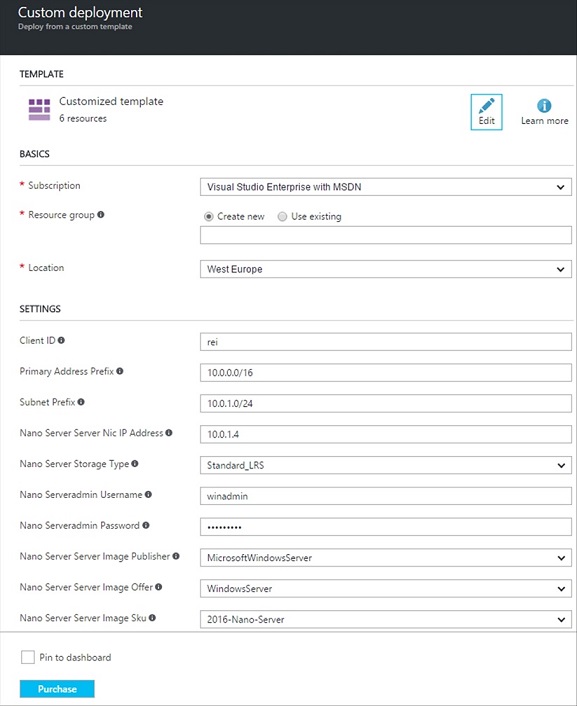
Under the BASICS section, do the following:
- Choose the Azure Subscription you want to deploy to.
- Choose the Name of the Resource Group you want to deploy to or create a new one.
- Choose the Location you want to deploy to.
Under the SETTINGS section, the Parmater Values that are recommended that you change are:
- Client ID
The Parameter Values that you need to provide are:
- Nano Serveradmin Username
- Nano Serveradmin Password
- Nano Server Key Vault Id
- Nano Server Certificate Url
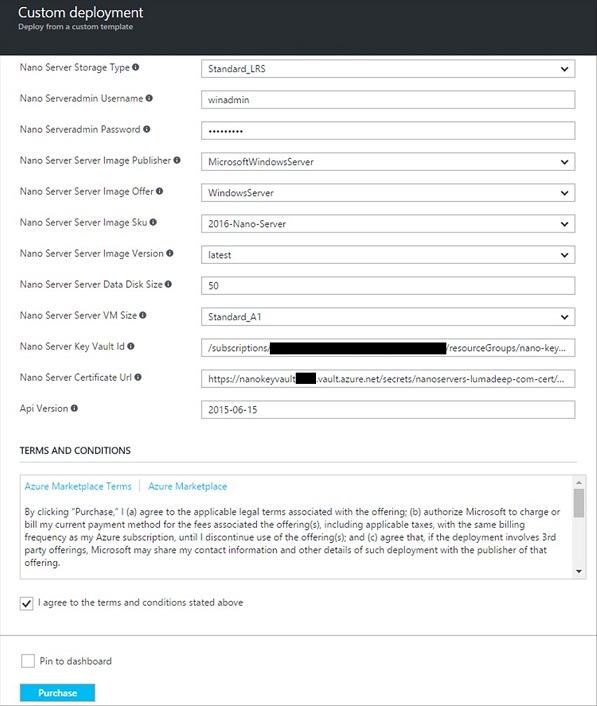
Change the Nano Serveradmin Username and Nano Serveradmin Password to the values you previously set for the NanoServerLocalAdminUsername and NanoServerLocalAdminPassword when running the setup-deployment-env-for-nano-server-in-azure.ps1 PowerShell script. Refer to the output from the same script for the values to use for the Nano Server Key Vault Id and Nano Server Certificate Url. The ARM Template Deployment will fail without these last two values as the ARM Template is written to look in the Azure Key Vault created earlier in the script for the value of the Self-Signed Certificate to use for the WinRM Listener.
The rest of the predefined values should work under most circumstances; however, they can be modified if required.
Once you are finished, scroll down to the bottom of the blade and put a checkmark in the I agree to the terms and conditions stated above checkbox. Afterwards, click on the Purchase button to kick off the deployment.
The deployment should take between 5 to 10 minutes to complete. Afterwards, open up the Resource Group you deployed the Nano Server to and make note of DNS Name of the Public IP Address Resource.

Next, we need to verify connectivity to the Nano Server using the Credentials set earlier via PowerShell Remoting. Open up an elevated PowerShell prompt or use the existing PowerShell prompt used previously.
Start the Windows Remote Management (WS-Management) Service on the machine you are working from.
Start-Service WinRM
Add the FQDN of the Nano Server to your TrustedHosts Configuration.
Set-Item WSMan:\localhost\Client\TrustedHosts -Value luma-nanosrv-at.westeurope.cloudapp.azure.com -Concatenate -Force
Setup a Powershell Remoting Session to the Nano Server.
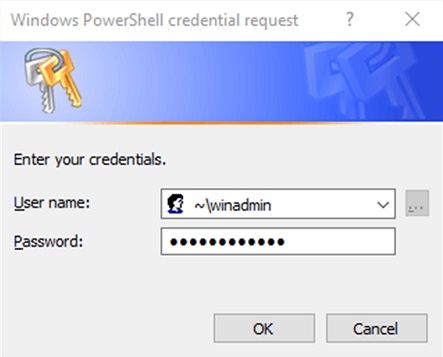
$Session = New-PSSession -ComputerName luma-nanosrv-at.westeurope.cloudapp.azure.com -Credential ~\winadmin
Type in the Password of the Nano Server Username when prompted.
Authentication to the Nano Server may take a few seconds to complete and you won’t get a response back from the server. Run the Get-PSSession cmdlet to verify that the PowerShell Remoting Session to the Host is open.

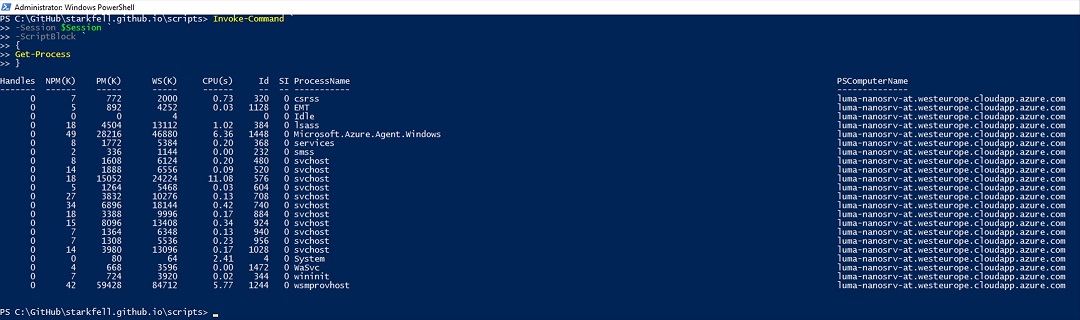
Retrieve the current running processes on the Nano Server as a final connectivity check.
Invoke-Command `
    -Session $Session `
    -ScriptBlock `
    {
        Get-Process
    }
You should get the current running processes on the Nano Server similar to what is shown in the screenshot below.
Install IIS on the Nano Server
From the elevated PowerShell prompt created earlier, install IIS on the Nano Server.
Invoke-Command `
    -Session $Session `
    -ScriptBlock `
    {
        Install-Module -Name NanoServerPackage -SkipPublisherCheck -Force
        Install-PackageProvider NanoServerPackage
        Set-ExecutionPolicy RemoteSigned -Scope Process
        Import-PackageProvider NanoServerPackage
        Install-NanoServerPackage -Name Microsoft-NanoServer-IIS-Package -Culture "en-us"
    }
You will be prompted to install the NuGet Provider, type Y and hit Enter.

The required Packages will then be downloaded and installed on the Nano Server. You will see the details of the Microsoft-NanoServer-IIS-Package when the installation is complete.

Install the ASP.NET Core Module
In order for ASP.NET Core to function on Nano Server, the ASP.NET Core Module is required to be installed on the Nano Server is it is responsible for process management of ASP.NET Core HTTP listeners and to proxy requests to processes that it manages. Currently, the only option of getting the ASP.NET Core Module installed on the Nano Server is by installing the .NET Core Windows Server Hosting bundle on a normal machine like Windows Server 2016 Standard and then manually copying the aspnetcore.dll and the aspnetcore_schema.xml files to their required locations on the Nano Server.
To save time and trouble, this process has already been completed and both files are hosted in my GitHub Repository. Note that both of these files are from .NET Core 1.0.1; however, the latest version of these files available from Microsoft at the time of this writing is .NET Core 1.1.
Download the ASP.NET Core files locally to your machine in C:\Windows\Temp.
Invoke-WebRequest `
    -Uri "https://github.com/starkfell/starkfell.github.io/blob/master/binaries/continuous-deployment-to-nano-server-in-azure/aspnetcore.dll?raw=true" `
    -OutFile C:\Windows\Temp\aspnetcore.dll
Invoke-WebRequest `
    -Uri "https://raw.githubusercontent.com/starkfell/starkfell.github.io/master/binaries/continuous-deployment-to-nano-server-in-azure/aspnetcore_schema.xml" `
    -OutFile C:\Windows\Temp\aspnetcore_schema.xml
Copy the aspnetcore.dll file to the Nano Server.
Copy-Item `
    -Path "C:\Windows\Temp\aspnetcore.dll" `
    -Destination C:\Windows\System32\inetsrv\aspnetcore.dll `
    -ToSession $Session
Copy the aspnetcore_schema.xml file to the Nano Server.
Copy-Item `
    -Path "C:\Windows\Temp\aspnetcore_schema.xml" `
    -Destination C:\windows\system32\inetsrv\config\schema\aspnetcore_schema.xml `
    -ToSession $Session
Install .NET Core on the Nano Server
Download the following script locally to your machine in C:\Windows\Temp.
Invoke-WebRequest `
    -Uri "https://raw.githubusercontent.com/starkfell/starkfell.github.io/master/scripts/install-dotnet-core-on-nano-server.ps1" `
    -OutFile C:\Windows\Temp\install-dotnet-core-on-nano-server.ps1
Install .NET Core for Nano Server.
C:\Windows\Temp\install-dotnet-core-on-nano-server.ps1 `
    -NanoServerName luma-nanosrv-at.westeurope.cloudapp.azure.com `
    -Username winadmin
Type in the Password of the Nano Server Username when prompted.
You should get the following response back.

Update IIS to work with .NET Core on the Nano Server
Download the following script locally to your machine in C:\Windows\Temp.
Invoke-WebRequest `
    -Uri "https://raw.githubusercontent.com/starkfell/starkfell.github.io/master/scripts/update-nano-server-iis-for-dotnet-core-apps.ps1" `
    -OutFile C:\Windows\Temp\update-nano-server-iis-for-dotnet-core-apps.ps1
Next, run the following Script to update IIS on the Nano Server to work with .NET Core.
C:\Windows\Temp\update-nano-server-iis-for-dotnet-core-apps.ps1 `
    -NanoServerName luma-nanosrv-at.westeurope.cloudapp.azure.com `
    -Username winadmin
Type in the Password of the Nano Server Username when prompted.
You should get the following response back.

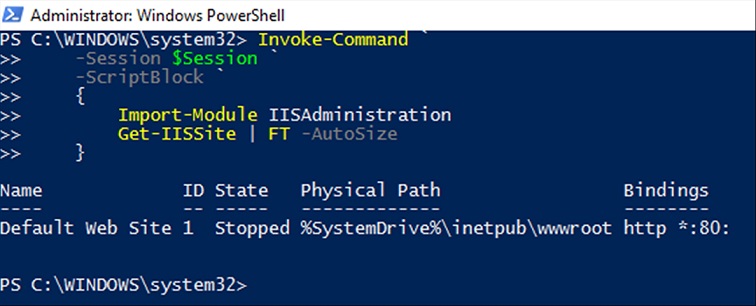
Verify the Default Web Site is on the Nano Server.
Invoke-Command `
    -Session $Session `
    -ScriptBlock `
    {
        Import-Module IISAdministration
        Get-IISSite | FT -AutoSize
    }
You should get the following response back.
Start the IIS Service followed by the Default Web Site.
Invoke-Command `
    -Session $Session `
    -ScriptBlock `
    {
        Start-Service W3SVC
        Import-Module IISAdministration
        Start-IISSite `
            -Name "Default Web Site" | FT -AutoSize
    }
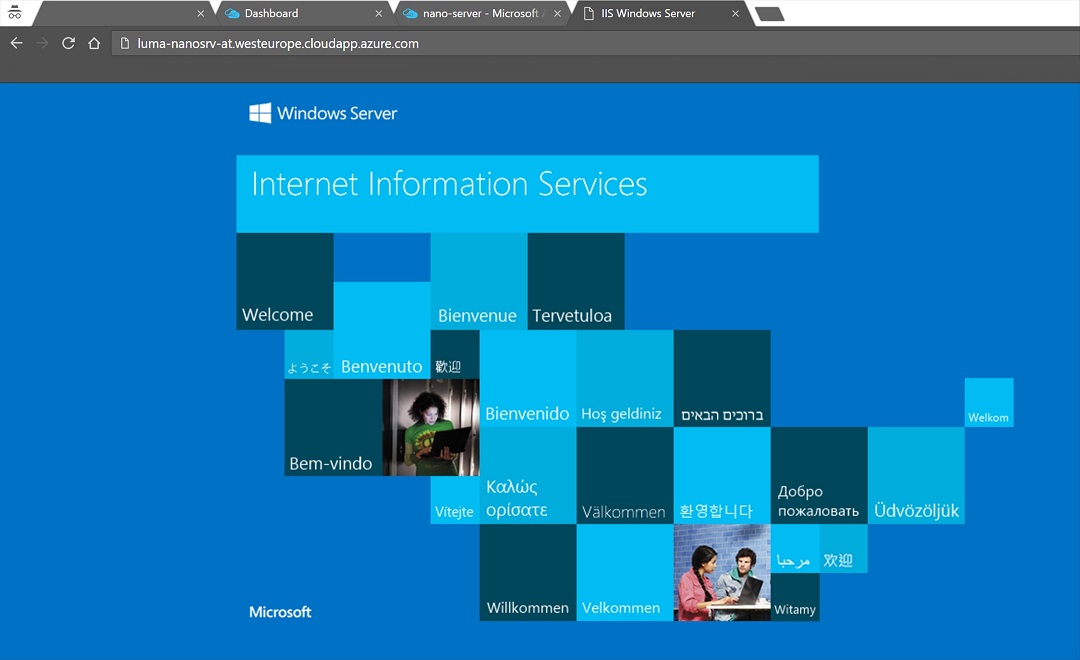
Verify the Default Web Site is accessible via a Web Browser.
Closing
In this article we deployed Resource Groups that are responsible for Hosting an Azure Automation Account, an Azure Key Vault, and a Nano Server. Additionally, we deployed IIS to the Nano Server, copied the .NET Core Modules to the Nano Server, Installed .NET Core on the Nano Server, and finally updated IIS to work with .NET Core.
The next article will cover the following:
- Deploying a Runbook to push changes from GitHub to the Nano Server
- Creating a new Webhook for the Runbook
- Adding the .NET Application to a public GitHub Repository
- Adding the Runbook Webhook to a GitHub Repository
- Triggering the deployment of the .NET Application to the Nano Server
Additional Resources
The links below are to articles that were essential to creating this blog post, I recommend buying the individuals responsible for writing them a cold adult beverage if you see them in person.
Thomas Maurer - How to deploy Nano Server in Azure
Alexandre Brisebois - Deploying Nano Server to Azure