Setting up Continuous Deployment to Nano Server in Azure - Part 3
This blog post will cover a way to securely create and store a webhook for an Azure Runbook and then add the webhook to GitHub using the GitHub API.
Overview
This article is the third in a series of blog posts on setting up continuous deployment to Nano Server in Azure.
- Setting up Continuous Deployment to Nano Server in Azure - Part 1
- Setting up Continuous Deployment to Nano Server in Azure - Part 2
- Setting up Continuous Deployment to Nano Server in Azure - Part 3
Using a webhook to update a web application is not inherently very secure in that as soon you have access to the URL, you have the ability to manipulate or trigger whatever endpoint it is pointing to. In most cases while you are developing an application, you can accidentally trigger a build process to kick-off without realizing it and cause your web application to tempoarily become unavailable. From an exploitation standpoint, you could constantly trigger a webhook causing a build process to run indefinitely thus keeping a web application in unstable state.
This article will cover one method you can take to prevent this type of exploit from happening by explaining how to create a webhook for an Azure Automation Runbook, store it in an Azure Key Vault, and add then add webhook to a GitHub Repository while ensuring that the URL of the webhook is never displayed in plain text throughout the process.
This article will cover the following:
- Create a new Webhook for the existing Azure Runbook, rb-Deploy-CoreWebAppDemo-To-Nano-Server
- Store the Webhook URL in an existing Azure Key Vault
- Create a new Personal Access Token in GitHub
- Add the Webhook to GitHub using the GitHub API and PowerShell
Prerequisites
All resources previously deployed to Azure in this series are required to be in place before continuing.
Additionally the following items are required.
- Follow the instructions below on a host running Windows 8.1 and higher or Windows Server 2016 RTM.
- Verify that you have access to a Co-Administrator or an Azure Organizational Account with access to an existing Azure Subscription.
- A basic understanding of GitHub as well as access to a Free GitHub Account is required.
Create a secure Webhook for the Runbook
Open up an elevated PowerShell prompt and login to Azure.
Add-AzureRmAccount
Make sure to change over to the Subscription where you deployed the resources in the previous posts.
Select-AzureRmSubscription -SubscriptionId <SUBSCRIPTION_ID>
Create a new Webhook for the Azure Runbook, rb-Deploy-CoreWebAppDemo-To-Nano-Server.
Syntax:
$WebhookURI = (New-AzureRmAutomationWebhook `
    -Name secure-webhook `
    -RunbookName rb-Deploy-CoreWebAppDemo-To-Nano-Server `
    -IsEnabled:$true `
    -ExpiryTime (Get-Date).AddYears(1) `
    -ResourceGroupName <AZURE_AUTOMATION_ACCOUNT_RESOURCE_GROUP> `
    -AutomationAccountName <AZURE_AUTOMATION_ACCOUNT> `
    -Force).WebhookURI
Example:
$WebhookURI = (New-AzureRmAutomationWebhook `
    -Name secure-webhook `
    -RunbookName rb-Deploy-CoreWebAppDemo-To-Nano-Server `
    -IsEnabled:$true `
    -ExpiryTime (Get-Date).AddYears(1) `
    -ResourceGroupName nano-automation `
    -AutomationAccountName nano-automation `
    -Force).WebhookURI
The Webhook URI that is normally shown when you run this command is stored in the $WebhookURI variable. At this point, you can echo out the variable in any manner you choose if you want to see the Webhook URL.
Add the new Webhook to Azure Key Vault
In order to store the Webhook URI in Azure Key Vault, the value of the Webhook needs to be converted into a secure string.
$SecuredWebhookURI = ConvertTo-SecureString -String $WebhookURI -AsPlainText -Force
Add the Webhook URI to the Azure Key Vault created in Part 1
Syntax:
Set-AzureKeyVaultSecret `
    -VaultName <KEY_VAULT_NAME> `
    -Name webhook-uri `
    -SecretValue $SecuredWebhookURI `
    | Out-Null
Example:
Set-AzureKeyVaultSecret `
    -VaultName nanokeyvaultf4ac `
    -Name webhook-uri `
    -SecretValue $SecuredWebhookURI `
    | Out-Null
Create a new Personal Access Token in GitHub
In order to add the Webhook URL programatically to GitHub, a Personal Access Token needs to be generated as an alternative for using Basic Authentication. Additionally, we can scope the type of access the Personal Access Token has in the GitHub Account as well as remove it at any point in time in the future.
Start by going to https://github.com/settings/tokens and logging into your GitHub Account.
You should be on the Personal Access tokens page, click on the Generate new token button.

In the Token description section type in azure automation webhook. Grant the webhook admin:repo_hook rights and then scroll down to the bottom of the page and click on the Generate token button.

Note: If you include a Token somewhere in your GitHub Repository in clear text, GitHub will automatically revoke the Token and notify you via e-mail.
Add the new Personal Access Token to Azure Key Vault
Copy the Personal Access Token and convert it into a secure string in the elevated PowerShell prompt from earlier.
$SecuredToken = ConvertTo-SecureString -String "fff9af39fe47f89e54e87866adc1ee9e9dec000d" -AsPlainText -Force
Syntax:
Set-AzureKeyVaultSecret `
    -VaultName <KEY_VAULT_NAME> `
    -Name github-pat `
    -SecretValue $SecuredToken
Example:
Set-AzureKeyVaultSecret `
    -VaultName nanokeyvaultf4ac `
    -Name github-pat `
    -SecretValue $SecuredToken
Add the Webhook to GitHub from Azure Key Vault using PowerShell
In the same elevated PowerShell prompt from earlier, retrieve the value of the Personal Access Token in clear text and leave it in a variable.
$Token = (Get-AzureKeyVaultSecret -VaultName nanokeyvaultf4ac -Name github-pat).SecretValueText
Retrieve the value of the Webhook URI from the Azure Key Vault in clear text but leave it in a variable.
$WebhookURI = (Get-AzureKeyVaultSecret -VaultName nanokeyvaultf4ac -Name webhook-uri).SecretValueText
Create the payload to add the webhook to GitHub.
$GitHub_Webhook = @{
    name = "web"
    active = $true
    events=@("push")
    config=@{
        content_type = "json"
        insecure_ssl = 0
        url = "$WebhookURI"
    }
}
Convert the payload to JSON.
$GitHub_Webhook_JSON = $GitHub_Webhook | ConvertTo-Json
Add the Webhook to GitHub using the GitHub API from PowerShell.
Syntax:
Invoke-RestMethod `
    -Method Post `
    -Uri https://api.github.com/repos/<GITHUB_USERNAME>/<REPOSITORY_NAME>/hooks `
    -Body "$GitHub_Webhook_JSON" `
    -Headers @{ "Authorization" = "token $Token" } | Out-Null
Example:
Invoke-RestMethod `
    -Method Post `
    -Uri https://api.github.com/repos/starkfell/nano-deploy-demo/hooks `
    -Body "$GitHub_Webhook_JSON" `
    -Headers @{ "Authorization" = "token $Token" } | Out-Null
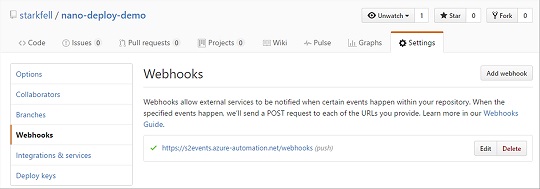
Go to the nano-deploy-demo repository settings of where you added the Webhook and verify it is there.

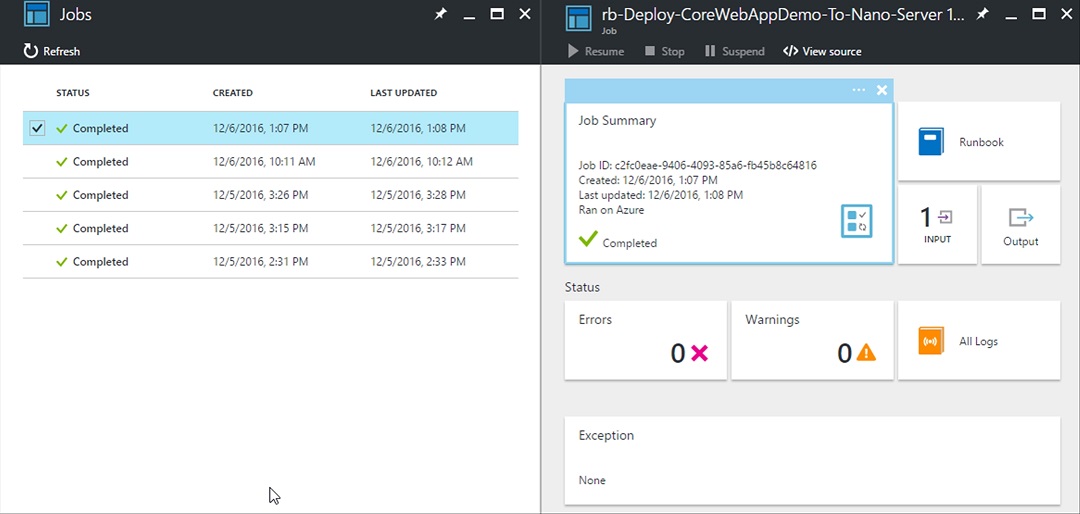
Lastly, if you go into the Jobs view of the Azure Runbook, you should see a job running or completed that was triggered by the addition of the Webhook in GitHub. This is because once a Webhook is added to GitHub, GitHub will attempt to trigger the Webhook to verify connectivity with it’s intended endpoint. This is something you will want to be aware of before adding Webhooks in your Production Environments to ensure you do not accidentally kick off a deployment process because of the wrong event.

Retrieve the Webhook URL using the GitHub API (Optional)
Run the command below to see the full details of the Webhook in GitHub.
Warning: This will display the Webhook URL in clear text.
Syntax:
Invoke-RestMethod `
    -Method Get `
    -UseBasicParsing `
    -Uri https://api.github.com/repos/<GITHUB_USERNAME>/<REPOSITORY_NAME>/hooks `
    -Headers @{ "Authorization" = "token $Token" }
Example:
Invoke-RestMethod `
    -Method Get `
    -UseBasicParsing `
    -Uri https://api.github.com/repos/starkfell/nano-deploy-demo/hooks `
    -Headers @{ "Authorization" = "token $Token" }
Closing
In this article we covered how to create a new Webhook for an Azure Runbook, store the Webhook in Azure Key Vault and then add the Webhook to GitHub without the Webhook ever appearing in clear text during this process.
The next article will cover how to parse Webhook Data from GitHub in Azure Automation Runbooks.
